Getting started with Sensor
Take the following six steps to enroll a machine:
- Create an account
- Prepare a host
- Create a machine token
- Run the installer
- Create a profile
- Assign it to the machine
1. Creating an account
Once you receive an invitation to join a tenant, follow the instructions in the email to create an account. After verifying your email address, you are prompted to set up a two-factor authentication (2FA) method.
During the first login you are asked to review and sign the End User License Agreement (EULA). Afterwards you are taken to the portal, where your tenant's machines, profiles, and providers are listed.
If you belong to more than one tenant, check which one is active before you continue. Machines, machine tokens, providers, and profiles all belong to a single tenant, and everything you create is stored in the tenant you have selected.
2. Preparing a host
A machine needs a dedicated Linux host that you are willing to expose to the internet. Work through this list before installation:
- Use a host with no production role and no data on it. Machines emulate services, so there should be nothing real behind them.
- Put the host on a segregated network. Place it in a DMZ or its own isolated segment, with no route back into your production or corporate networks. A machine is meant to be found and attacked, so a host that is genuinely compromised must have nowhere to go.
- Allow inbound traffic from the internet to the ports the containers in your profile bind. A machine that is firewalled records nothing, so avoid restricting source addresses. Managed Containers lists what each one binds.
- Do not filter the machine's outbound traffic. A machine connects out to more destinations and ports than it enrols on, and they change over time. Filtering outbound traffic will break the machine.
3. Creating a machine token
A machine token is what ties a new host to your tenant.
In the portal, open Machines and select Create Token.

Copy the token and save it. It is shown once and cannot be retrieved again.
4. Installing the machine agent
On the host, download the installer from the public API and run it with your token:
curl -fsSL https://sensor-api.shadowforce.io:8082/install.sh -o install.sh
sudo bash install.sh --yes --join-token '<PASTE_YOUR_TOKEN_HERE>'
The installer is downloaded to your working directory as an ordinary file rather than piped straight into a shell, so you can read it before you run it. Open the URL in a browser, or run less install.sh, before the second command.
The installer detects the distribution, installs and enables Docker CE if it is not already present, and starts the sensor-agent container. During start-up the agent:
- registers with the API using the machine token, which consumes the token and places the host in your tenant,
- generates a key pair and submits a certificate signing request,
- receives its signed mutual-TLS certificate, and
- begins fetching its configuration every 30 seconds.
A host that registers with a valid token is active immediately.
5. Creating a profile
A profile is the named set of containers a machine runs. You assign a profile to a machine rather than configuring the host directly, so the same profile can drive as many machines as you like.
In the portal, open Containers, select the Profiles tab, and select Create Profile.

Follow the guided steps to add the containers you want the machines using it to run.
6. Assigning a profile
A newly enrolled machine runs no honeypots. It is registered, healthy, and reporting in, but until it has a machine profile there is nothing for it to start. Assigning one is the step that turns it into a working machine.
In the portal, open Machines, select your new machine, and select Edit Machine.

In the dialog, pick a profile from the Profile menu and select Save Changes.
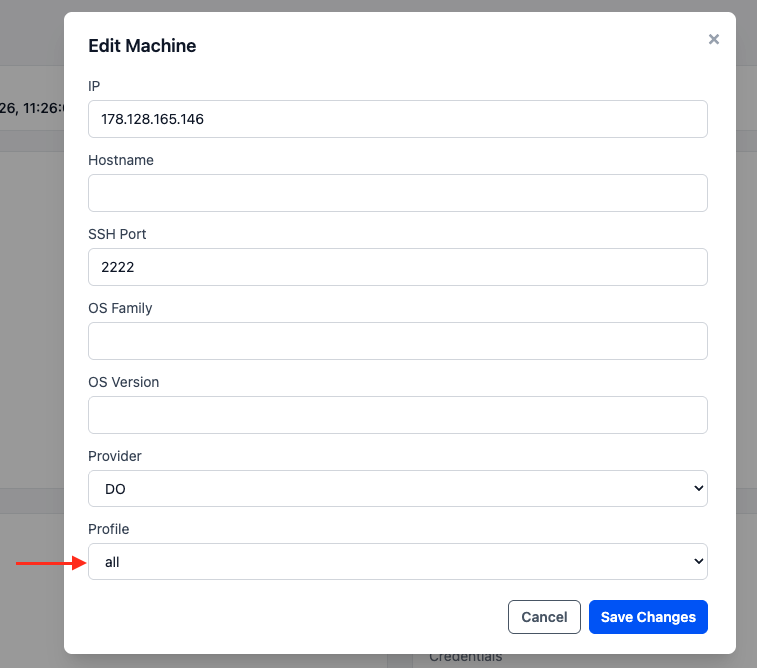
The changes are applied on its next configuration fetch, so the honeypot containers begin starting within about 30 seconds. First start can take a few minutes while the container images download.
Confirming the machine is active
Everything you need is on the machine record in the portal.
-
Status is
approved, and the record is filled in with the host's public IP, hostname, operating system, geographic location, and autonomous system. That confirms the host registered and was activated. -
Last connected advances roughly every 30 seconds. A timestamp that keeps moving means the machine is running and reaching the API; one that stops is the first sign something is wrong.
-
Events start arriving once a profile is applied and its containers have started. A machine exposed to the internet is found by background scanning on its own, usually within minutes.
Do not connect to your own machine to test it. Every connection a honeypot records is treated as unsolicited, so probing the host yourself files an event against the address you probe from.
Archiving events to your own S3 bucket
Alongside its normal delivery to Baffin Bay, your tenant can have every machine write a copy of what its honeypots record to an S3 bucket you control.
This is configured once for your tenant. In the portal, open Settings and select the External logging tab.
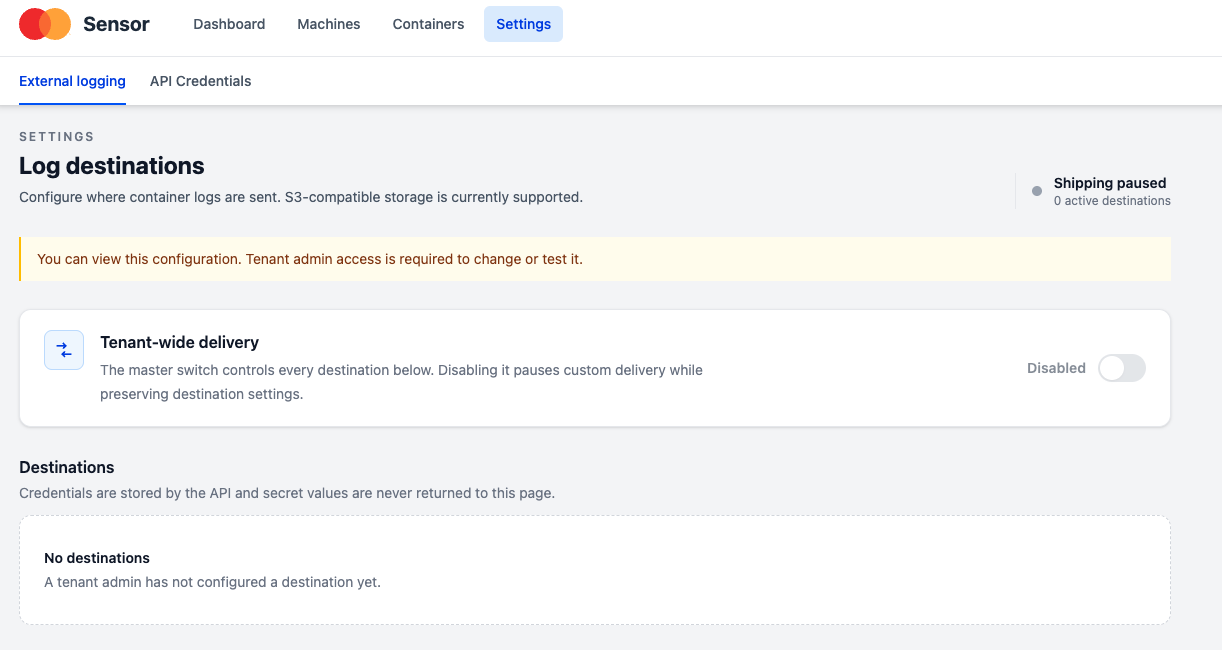
Two things have to be on before anything is shipped: Tenant-wide delivery, the master switch at the top of the page, and the destination itself. Turning the master switch off pauses delivery to every destination while keeping their settings. Adding, changing, or testing a destination requires tenant admin access, other members can see the configuration but not edit it.
There is nothing to set at install time and nothing to change on a host as machines pick up a new destination on their next configuration fetch, within about 30 seconds.
Objects land under <path>/<container>/YYYY/MM/DD/, as gzip-compressed newline-delimited JSON. The archive carries event records only; files that attackers upload, and packet captures, are shipped separately and are not written to your bucket.
Changing what a machine runs
Never reconfigure a machine by logging into it. Change the profile on the machine, or change the containers in the profile, and every host using it will follow in less than a minute. Changing a machine's profile is the same Edit Machine dialog used at enrolment, see Assigning a profile.
Next steps
- Managed Containers — the honeypots you can run, and what each one captures.
- Building your own honeypots — add a container of your own.