Configure new proxy
There are four main steps to configuring a protected asset in L4 proxy mode:
- Set up your L4 proxy service
- Test the configuration
- Modify the DNS record (if needed) **
- Limit access to the protected asset
** NOTE: Lowering the time-to-live (TTL) to 5 minutes or less, as suggested in the prerequisites section, will significantly reduce the time needed for the changes in step 1 to take effect.
Step 1: Create an L4 proxy service
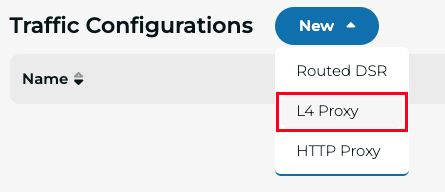
Navigate to Traffic Management -> Traffic Configuration -> New -> L4 Proxy
General Settings
You can choose to create an L4 proxy service, which is a generic TCP/UDP proxy. Or create an HTTP proxy service to handle either HTTP or HTTPS (HTTP/1.1 or 2.0, with TLS 1.2-1.3.) This documentation describes how to create an L4 proxy.
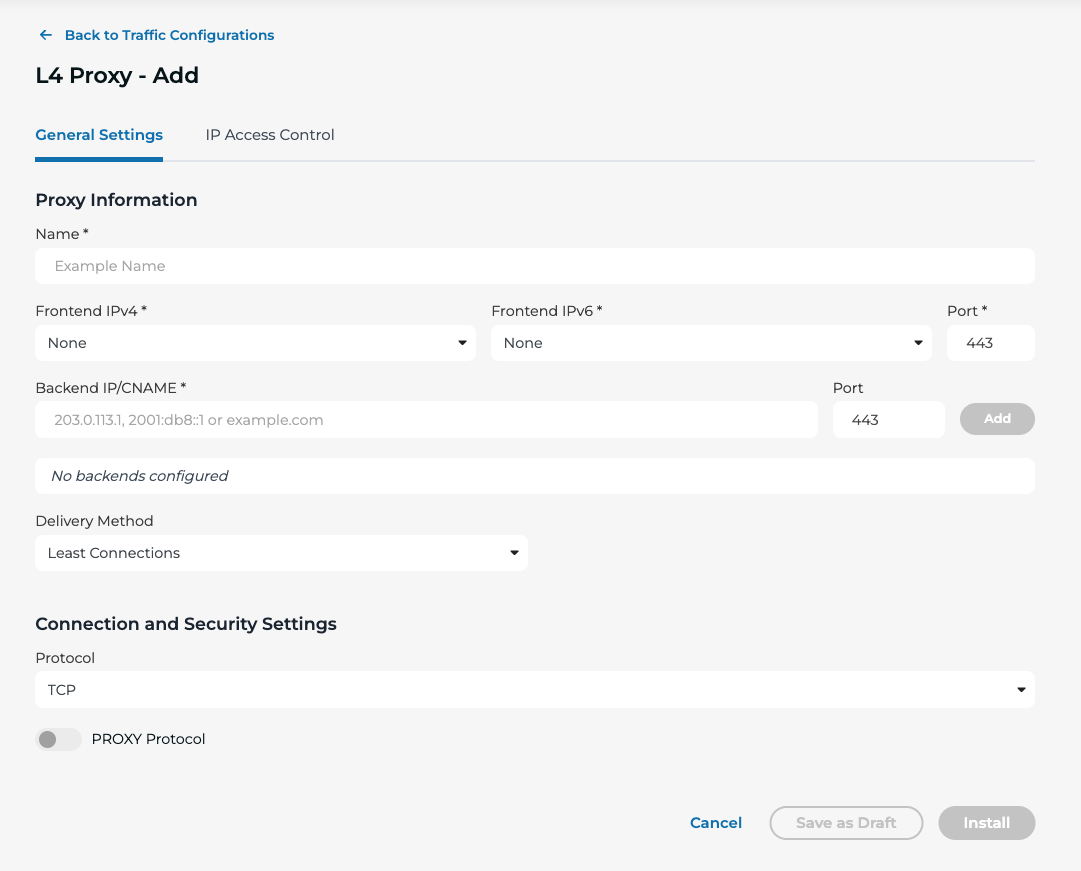
- Name - The display name of the Traffic Configuration (proxy service).
- Frontend IP (IPv4 & IPv6) and port - Select one of your assigned anycast IPs for the proxy. You will point the A/AAAA record in the DNS server to this IP. Specify the port the proxy service should accept traffic on.
- Backend IP / CNAME and port - Here you specify the backend IP (or several IPs) that you want the traffic to be sent to after traffic has traversed the Threat Protection service. Specify the backend port for delivering traffic to the backend server.
- Delivery Method - Select the load-balancing method used when sending the traffic to the backend server. Least Connection is chosen by default.
- Least Connection: Traffic will be sent to the backend with the least current connections.
- Round-Robin: Connections will be distributed equally between the backends using the Round-Robin method.
- IP Hash - Source IP Persistence: Some applications require stickiness between a client and a server. Choose this if you require source IP stickiness, using a load-sharing algorithm which hashes based on the source IP.
- Protocol - Select the transport protocol you want to use (TCP, UDP or TCP/UDP)
- Proxy Protocol - When enabled, we will send to the backend server the original client IP using the PROXY protocol header. This has a plain text format and is useful to transmit client information for non-HTTP protocols. Enable it if you would like us to pass the original client IP address to your backend server. We currently only support PROXY protocol v1. The backend service needs to understand PROXY protocol v1 to consume and process the information correctly.
- Limit Access To - By default, connections from any IP are allowed to the Traffic Configuration. By specifying them here, you can restrict which IPs can access the Traffic Configuration.
Step 2: Test the configuration
HTTP services, you should now be able to access your service through the anycast IP assigned to you. If you are using your own routed IP (Customer Anycast IP), you can perform your tests against the same IP. You can use for example cURL. Test the functionality to ensure everything works as expected. For Non-HTTP services (e.g. DNS, FTP, or email server), use tools such as dig, telnet, or netcat to test your service functionality, to ensure that your service responds as expected. If you experience problems, please get in touch with Support.
Step 3: Modify the DNS record
To ensure traffic flows to the new protected IP, and in case you are using our allocated anycast IP as the Frontend IP, you need to redirect the traffic by for example updating your DNS A/AAAA record for the site to point to the proxy service configured. How this is done will depend on several factors; for example, if you run your own DNS server or use a third-party service. Once the changes are made, you can use the dig or nslookup command to verify that the changes have occurred.
Step 4: Limiting Access to the Threat Protection Center Proxy Source IPs
Once you have verified everything has propagated and is working as expected, we recommend updating your routers/firewalls or contacting your transit service provider to set an ACL (access control list) to limit the incoming traffic to the Threat Protection Center IP ranges. Doing this will ensure that a sufficiently skilled attacker is unable to attack the backend server from the internet. For a full list of ranges used by the Threat Protection Centers, please visit the Threat Protection portal, navigate to Network, then select TPC IP Sources. Alternatively, contact Threat Protection Support.